Transparency and sorting in Unity
Transparency often presents a problem when I’m working in Unity3D. The methods used for rendering objects in the right order doesn’t work well with transparency, so I often need a work-around specifically crafted to whatever I am trying to achieve. This isn’t some wierd quirk in Unity though, it’s just a problem with the way realtime rendering is done. In this post I show a couple of problems I have encountered, explain why they happen and what can be done to work around the issue.
Depth sorting and z-buffering
Depth-sorting is the most basic method for making object appear in the right order. To perform depth-sorting, the objects that needs to be rendered are sorted in order of distance between the camera such that objects that are far away from the camera will be rendered before those that are closer, such that any parts of the near objects overlapping the far away ones will overwrite them.
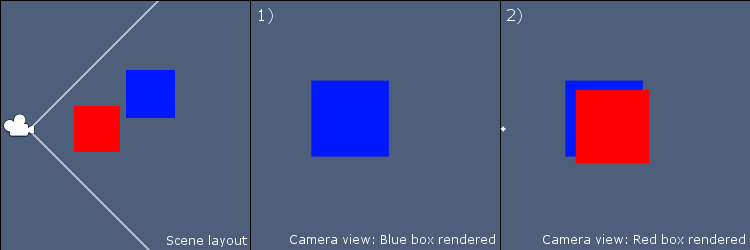
The boxed rendered in their entirety, but sorted such that the red box is drawn over the blue one.
But depth sorting isn’t good enough. Consider the shaped in the image below. You can’t draw them correctly using only depth-sorting. We need to be draw only the parts of an object that are not being obstructed by something drawn previously. That’s where z-buffering comes in.
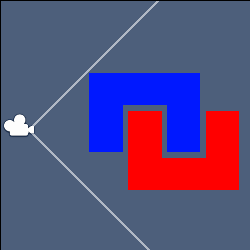
No sorting of these two shapes will make them render correctly
Z-buffering involves maintaining and reading from a z-buffer during rendering. Basically, a z-buffer contains a number for each pixel on the screen, which can tell you how far away from the camera the rendered pixel is supposed to appear. You can the skip rendering pixels in places that would override already rendered pixels meant to be in front, by skipping rendering in places with low z-buffer values.
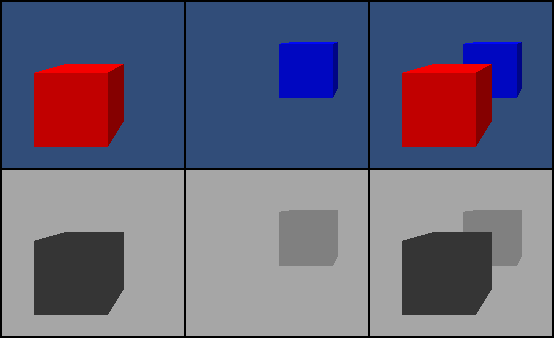
Z-buffer illustration. Top row is rendered images and the bottom row represents corresponding z-buffers. Darker color means lower z-buffer value.
For example, when rendering the boxes in the image above, the pixels rendered for the red box would result in low z-buffer values while the pixels for the blue box, further away from the camera, would result in higher z-buffer values. If we render both boxes in the same scene, first the red box, then the blue one, but when rendering the blue box, we skip every pixel with a higher z-value than the one already there, we would get an image where part of the blue box appears hidden by the red one, as shown above.
Cool, but…
Z-buffering is very smart for completely opaque objects, but how about transparency? Well lets assume for a moment that the red box from before was supposed to be transparent. Z-buffering wouldn’t work then, because the parts of the blue box that I should be able to see through the red one would not be rendered because of the existing lower z-values from the red box, well unless I rendered the opaque blue box first. Then everything would be fine. This is actually precisely what Unity does. It renders all transparent objects after all opaque objects have been rendered. The transparent objects still check the z-buffer, to ensure that they are not drawn in front of opaque objects that they should be behind, but they do not write their of z-values to the buffer, because that would lead to transparent objects hiding other transparent objects which should be visible through them.
So we are left with only depth-sorting. As we saw before, this has problems with complex geometry and we can’t have transparent objects partially overlapping each other because they aren’t written to the z-buffer. Okay, let’s live with that, we still have other issues.
Problem in 2D
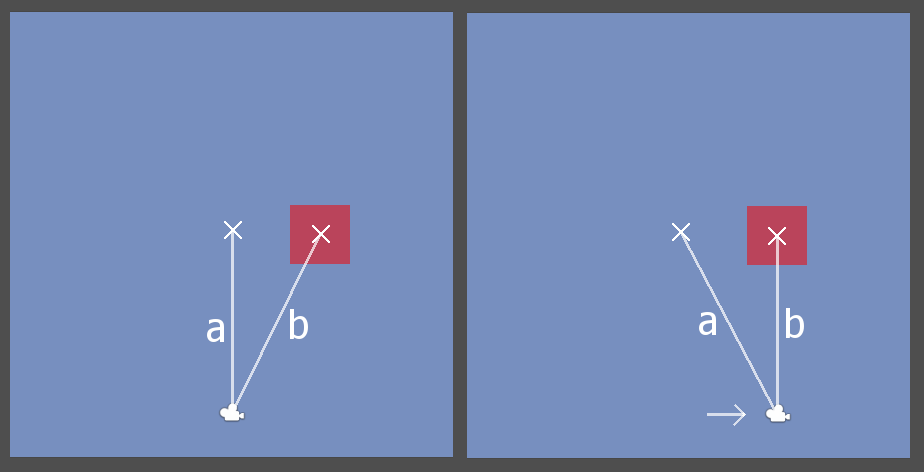
Let’s say we have 2D terrain and objects rendered as textures on planes, but using a perspective camera, like on the image below. The trees are supposed to be drawn behind the ground, but they are not. By default, Unity sorts objects rendered by a perspective camera using euclidian distance. Which means that the sideways position is also taken into consideration (don’t ask me why).
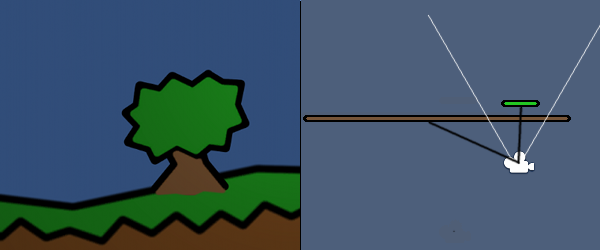
The distance to the tree is shorter than that to the ground despite of the tree being placed deeper in the scene.
An ortographic camera doesn’t have this issue, because it sorts the objects using depth only, and fortunately we can make our perspective camera do the same. All we need to do is set the transparencySortMode of our camera. We can do that by attaching the script below to the game object holding the Camera-component.
using UnityEngine;

[RequireComponent(typeof(Camera))]
public class ForceOrthographicSortMode : MonoBehaviour
{
    public void Start()
    {
        GetComponent<Camera>().transparencySortMode = TransparencySortMode.Orthographic;
    }
}
Problem in 3D
That wouldn’t fix another issue I’ve had though. In the image below, the large blue plane represents the surface of an ocean, and the transparent box is supposed to be floating above it, but when I move the camera, the box flips between being rendered as below and above the water.

Example of a problem that arises with large transparent objects.
The reason this happens is the same as before, but I can’t use the fix from before, because even if we were sorting purely based on depth, the cube would be rendered above or below the water depending on it’s horizontal position.
The problem with using euclidian distances for depth sorting.
The fix that I chose for this problem, was to decide that all transparent objects would either be drawn always above the water. Then I wrote a slightly modified version of the standard transparent-diffuse shader from Unity which assigned the model to a queue rendered before the default transparent shaders, but still after opaque objects. This shader, which you see below, was then used to render the ocean plane, making it appear below all other transparent models. It is not a perfect solution, but it does solve the problem I had with objects jumping between above and below water.
/*
* This is a slightly modified version of "Alpha-Diffuse.shader" from the Built-in shaders
* pack for Unity3D version 4.1.5 downloaded from http://unity3d.com/unity/download/archive
* The only modification is the change to the "Queue" tag, making objects using this shader
* render before other transparent objects.
*/

Shader "Custom/Transparent-Diffuse" {
Properties {
_Color ("Main Color", Color) = (1,1,1,1)
_MainTex ("Base (RGB) Trans (A)", 2D) = "white" {}
}

SubShader {
Tags {"Queue"="Transparent-20" "IgnoreProjector"="True" "RenderType"="Transparent"}
LOD 200
ZWrite On
ZTest LEqual

CGPROGRAM
#pragma surface surf Lambert alpha

sampler2D _MainTex;
fixed4 _Color;

struct Input {
float2 uv_MainTex;
};

void surf (Input IN, inout SurfaceOutput o) {
fixed4 c = tex2D(_MainTex, IN.uv_MainTex) * _Color;
o.Albedo = c.rgb;
o.Alpha = c.a;
}
ENDCG
}

Fallback "Transparent/VertexLit"
}
It’s a pretty big compromise and somewhat anticlimactic, but it got my job done.

Using the above shader to render the blue ocean plane fixed the issue.
More info – and possible better explanations than mine:
- The wikipedia page on z-buffering is worth a read.
- Steve Baker explains a number of reasons why the z-buffer just won’t work with transparency.
- I recommend starting at the shader reference section of the unity docs if you want to dabble in shader programming. Do follow the links to tutorials in there.
- The surface shader examples in the Unity docs provides excellent stepping stones for your own shader tinkering.
